
When it comes to business and SEO, I’m a big believer in Pareto’s principle: 80% of the results come from 20% of the work. We call this the 80/20 rule. It helps focus your time on tasks that actually drive results.
The purpose of this click through rate optimization process is to quickly increase the rankings on our sites as soon as we get them without having to wait weeks for new articles or building links. I’m going to show you how these SEO title tips have lead to a 47% increase in organic traffic in one week on one of our websites.
What is the 80/20 Of On-Page SEO?
Testing title tags is the number one on-page factor that can move you in the SERP. They are the 80/20 of on-page SEO. You can spend all day fucking with keyword density and factors that may or may not matter anymore to get a 1% improvement. On-page SEO tools are notorious about giving you an epic checklist of busy work to make sure you keep using their tool – they will even find something wrong with pages sitting in the #1 position for competitive keywords.
Remember: The 80/20 rule. We could do a dozen things to hundreds of pages like modify keyword mentions, h2s, alt tags, but we choose not to because that would take way more time with little added benefit. There are three on-page factors that really move the needle: The Title, The Meta Description, and The Date.

We focus on the 20% of updates that get 80% of the results. 
The 80/20 rule can be applied to anything really. We eat a lot of authentic Mexican food here in Valle de Bravo. The 80/20 of Mexican food is a tortilla, meat, and salsa. Enchiladas = tortilla, meat, salsa. Tacos = tortilla, meat, salsa. Chilaquiles = fried tortilla, meat, salsa.
Here’s the best part:
This strategy can drive more traffic to your website even if your ranking doesn’t increase because more people will be clicking on your title.
Look:
I’m not the first person to optimize a title tag. I just took what the top sites did and made it into a repeatable and scalable process.
Results:
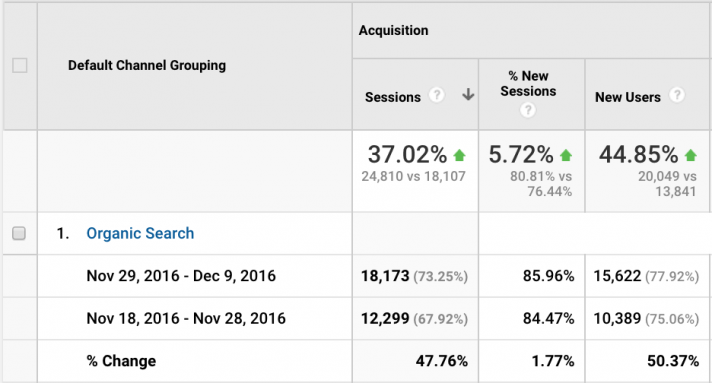
I’ve implemented this process across dozens of sites. In this example I had a 47% increase in organic traffic in 1 week. However, a 10%-15% lift in traffic is more common after running through the title tag optimization process.
Here are the results from analytics the week after the update:
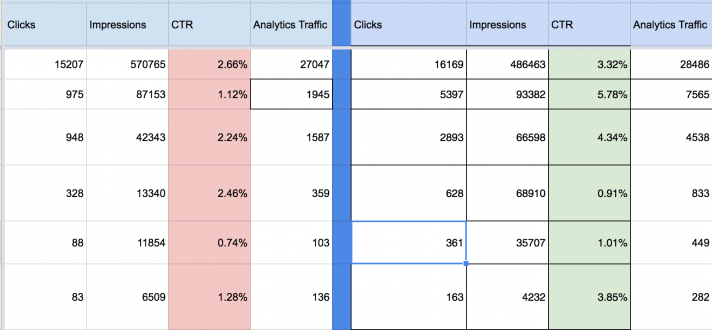
Click through rates improved as well as traffic. I pulled search console data into a spreadsheet to compare click through rate improvements:
Note:
I only recommend targeting keywords with poor click through rates (<4%) that you are not already ranking in the top 3 for. If you are there, your title tag is already pretty decent (and you could actually lose traffic if you write a worse one).
What’s a good click through rate?
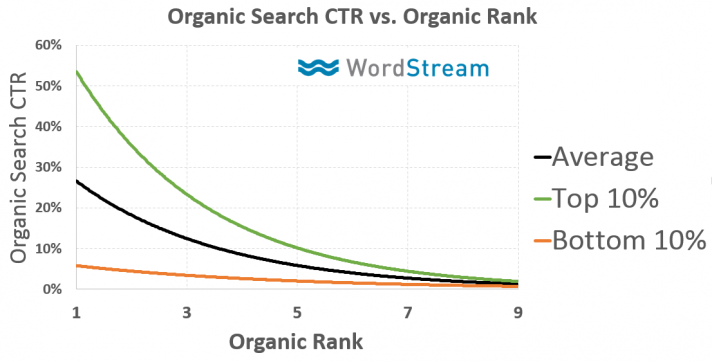
Every position has a different click through rate. The click through rate formula is: Clicks/Impressions. In other words, if 1000 people see your page in google and 10 click, you have a 1% click through rate. Better click through rates = higher ranking = more visitors. Larry Kim analyzed 1,000 keywords from search console and graphed out his average click through rates by position (he’s also got some great examples of the top 10% unicorns in that post):
Title & Meta Tag Step-By-Step Process
Step 1. Create Testing Spreadsheet
Make a copy of this blank template.
Step 2. Download the Webmaster Report
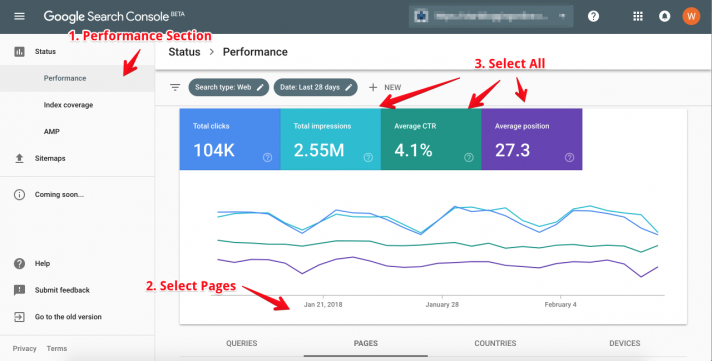
Download the webmaster report from Search Engine Console (aka Webmaster Tools). If the site was just added to search console you will need to let SE Console get at least a week of data.
- Go to https://www.google.com/webmasters/tools/
- Choose the correct property. If there is an https version of the domain choose that one.
- Search Traffic —> Search Analytics
- Check all boxes at the top (Clicks, Impressions, CTR, Positions)
- Select Pages
- Scroll to the bottom and select “Download” to CSV
Step 3. Download Rankings From Ahrefs
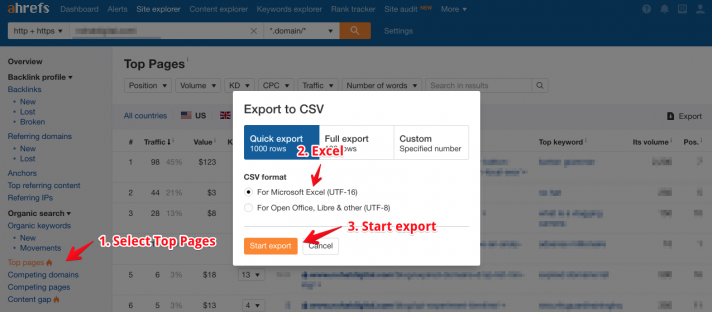
Download what we are currently ranking for from Ahrefs and add that to the Ahrefs tab in the spreadsheet. You can find this by putting in the URL and then clicking on Top Pages to see the pages currently ranking, and then export that report. Use the default “Quick Export” and “Excel” options and then click “Start Export”.
Step 4. Download Google Analytics Data
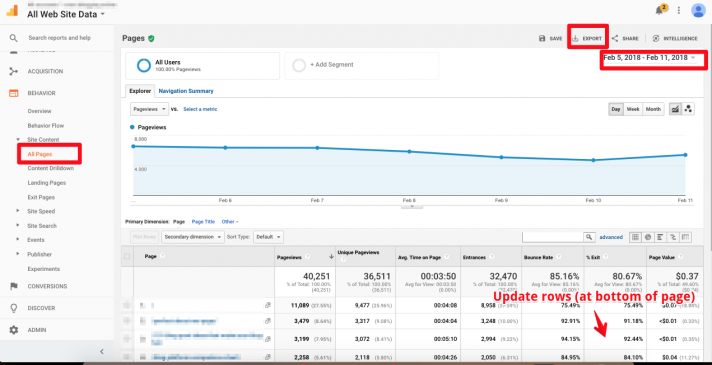
Download the traffic data for the same time period the Search Engine Console data is for.
- Login to Google Analytics (https://analytics.google.com/analytics/web/)
- Update date range to match Search Engine Console data
- Go to Behavior → Site Content → All Pages
- Change the dropdown to show 5000 rows then Export to CSV and copy/paste into appropriate
- Analytics tab in the spreadsheet
Step 5. Download Title & Descriptions From WordPress
Download the titles & descriptions from WordPress. This process will only work if the site uses the Yoast SEO plugin. It will save a lot of time from having to copy/paste each title and meta description into the tracking sheet for every page.
- Install the plugin below on the site then export all the published URLs following the steps in the video and paste them here.
Step 6. Update The Title Tag
Start with the pages with the most clicks. Skip any pages where we are already ranking #1 or where we have >4% CTR.
https://www.youtube.com/watch?v=I8k5mIbnMv8
- The target keyword gets pulled into the main sheet from the Keywords – Ahrefs tab. You can find more keywords for each page by putting the page URL into Ahrefs then going to the Organic Keywords section. If there are multiple keywords for one page, use both of them if they fit naturally.
- Google the Keyword(s) and look at what top 2 Adwords ads and/or organic results are showing. These people have spent thousands of dollars testing words. Do not copy them exactly but look for common phrases or keywords they are using.
- Include the keyword (exact match) towards the beginning of the title
- Include a number
- Include (parentheses) or [brackets]
- Include a “power phrase”. List of power phrases is in the spreadsheet
- Make sure you are within the title tag character limit (it’s actually measured by pixels, but characters are easier for us to count in a spreadsheet. Keep it under 60 characters).
- Note: If you “keep it pretty similar” and make a small change you will only see a small change in rankings. You need to go through the whole checklist and properly optimize the title.
SEO Title Example:
BAD TITLE (OLD)
WordPress, Tumblr, Medium or …? 8 Best Blogging Platforms Reviewed
X Keyword is at the end
X No parenthesis or brackets
X Asks a rhetorical question
✓ Contains the keyword “blogging platform”
✓ Contains a power phrase
✓ Has a number
GOOD TITLE (NEW)
8 Best Blogging Platforms Reviewed (Updated 2018)
✓ Keyword is at the beginning
✓ Contains parenthesis
✓ Contains the keyword “blogging platform”
✓ Contains a power phrase
✓ Has a number
DO NOT: Just add “Updated 2018” to the end of every title tag. These are supposed to be unique!
Step 7. Update The Meta Description
Same rules apply. Do not write “click here” because people can’t click on meta descriptions. Do your best to answer the searcher’s question in this. Try and get two keywords into it if possible.
Meta Description Example:
BAD META (OLD):
Looking for a reliable and easy to use blogging platform to launch your new blog with? You’re in the right place! Click here to compare the top 8 options!
X Doesn’t say what the options are or answer the question.
X Says to “click here” when you can’t click on metas
X Asks a rhetorical question
X Too many exclamation points!!
✓ Contains the keyword “blogging platform”
✓ Has a number
GOOD META (NEW):
The 8 best blogging platforms to start a free blog include WordPress, Tumblr, Medium…
✓ Answers the question
✓ Leaves the reader wanting more
✓ Contains the keywords “start a free blog” from advertisements and “best blogging platforms” and “blogging platforms”
✓ Has a number
A note on meta length: Google recently updated the character limits allowed for your meta description from ~155 to ~300 characters. I haven’t tested the impact of short vs long descriptions yet. Yoast is recommending 320 characters and Moz is recommending 300. Sometimes Google does what it wants and pulls a random paragraph from your site for the meta (generally one that is keyword dense) but it’s still a good idea to set your own meta description.
Step 8. Update The Date
Update the date in WordPress to today (so to whatever date you’re doing this). If the date is mentioned on the page, update that too. This helps boost our ranking.
Step 9. Set Reminder to Analyze Results & Update
Once finished updating the titles & meta descriptions for the most important pages for each site, mark it off in the Google calendar and set a reminder to come back to it in 1 month.
After 1 month you will export a new set of Search Console, Google Analytics, and Titles/Descriptions data for the past month in the “Datespan 2” tabs, then after 2 months fill in the “Datespan 3” tabs. You will be able to see the change over the previous month and fix any pages that don’t meet our criteria. Note that you will need to unhide columns H:N to reveal the Datespan 2 data and unhide columns P:V to reveal the Datespan 3 data in the main tab.
Key Takeaways
- Include the keyword in the title & meta tag towards the beginning
- Include a power/magnet phrase in the title tag
- Include parentheses or brackets in the title tag
- Include a date or number
- Track the CTR and traffic in a spreadsheet (download from WM tools)
- Set a calendar reminder to update the titles on an ongoing basis
If you find this process helpful please share it!
What’s your 80/20 when it comes to SEO? Have you seen results from this process? Leave a comment below!